Sunday 28 February 2010

VMware ESX and Powershell

I had planned to explain a bit about using Powershell and VMware ESX together but having just seen a post from @AlanRenouf I through I would leave it to him to explain with his presentation from the London VMware User Group (VMUG).  To see a little of what you can do and some example scripts, head over to the link below.

http://www.virtu-al.net/2010/02/26/london-vmug-my-presentation/

When I know more about what to do with VMware and Powershell I will do an in-depth starter blog on it but for now Alans presentation is a great start.

Tuesday 23 February 2010

Active Directory in Server 2008R2 – Navigation and Basics for starters

Something Microsoft missed out on in Powershell v1 was active directory cmdlet, however for v1 Quest came to the rescue with their AD commands available free at http://www.quest.com/powershell/activeroles-server.aspx.  Now for the release of Windows Server 2008r2 the Active Directory guys have finally developed full set of cmdlets in a module for working with Active Directory out of the box.  Once Active Directory is installed onto a 2008R2 Domain Controller you will be able to do either “Import-Module ActiveDirectory” or you can just load from the shortcut in the Administrative Tools area on the start menu (but this is something you will want every day if your an AD Admin so right click the shortcut and say ‘pin to taskbar’.  Or if you want to manage your servers from your workstation you’ll require the Remote Server Administration Tools for Windows 7.  Which ever way you enter you will need to know what to do when you get in – below is a poster for your bedroom wall (or somewhere more useful) with your day to day commands, the image will link you to the Active Driectory Powershell Blog from where you can download it.
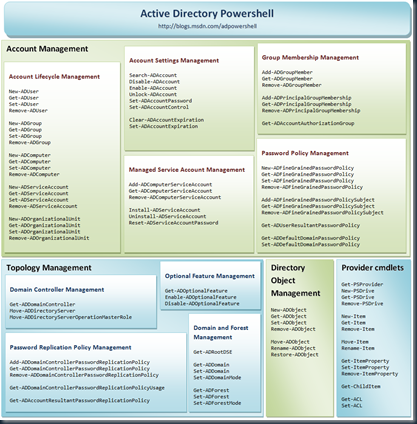
AD powershell cmdlet poster

So, Let get started… Once you are in powershell and have the ActiveDirectory module loaded type “Get-PSDrive” and you will see AD as one of the options – Yes this means you can “Set-Location AD:” and work your way through just like it was Windows Explorer (Thank you MS).  When you get the prompt of “PS AD:\>” try Dir and see where you can go.

image

As my server is just a test domain awaiting expansion my FQ domain name is just called Forest.Local .  To get into my active Directory I would just type “Set-Location ‘\DC=Forest,DC=Local’”.  Dir again and you will see your OU’s and Containers and you can keep going though using the Set-Location command or its’ alias CD to navigate to where you want to go.  If you go “Set-Location .\CN=Users" you can then try out some of the new cmdlets such as New-ADUser, Get-ADUser, Remove-ADUser – should all be self explanatory what they do (in case you’re wondering though New-ADUser will create a user, Get-ADUser will get you the users info of a specified user, and Remove-ADUser will Remove the users), if you need to know more use the Get-Help command.

The same applies to ADComputer, ADGoup, ADOrganisationalUnit, Etc.  This should cover you for all basic tasks you want to carry out in Active Directory from Powershell.

Something to be aware of is when you are using the Set-Location cmdlet you will need to know whether you are going to a container (CN) or OrganisationalUnit (OU) and when navigation to the domain you will need the DC.

You can tell what you need by using dir or the cmdlet Get-ChildItem and looking at the DistinguishedName.  So for my domain I start with “Set-Location ‘\DC=Forest,DC=Local’” then from there you can go into a container with “Set-Location .\CN=Users", go back up a level with “Set-Location ..”, and go into an Organisational Unit with “Set-Location .\OU=MyOrgUnit”

I know this is very basic stuff but it’ll get you by if you’re just starting out, so I hope it was a valuable read for someone.

Thanks for reading and please leave feedback,

Dave

Monday 22 February 2010

What Can I Use PowerShell For?

In this post I am after help from everyone who is already using powershell to help everyone who is learning.  I’m not just being lazy, however having been on holiday for a week I haven’t had a chance to update the blog so this should (if it works as planned) help get some good content onto the site quickly.

What I want to have a people using and with expertise (especially other blog/resource writers) write in the comments section of this post just a quick “mini blog post” with the following (if you can’t post a comment then please send an email with the following and I’ll upload on your behalf.):

  • Name of a useful cmdlet your find useful or you think is important to someone learning powershell
  • A short explanation how it’s used and why powershell is your choice of weapon for the task
  • Who you are and where you can be found for twitter/blogs/podcasts -  please also state the intended reader level of your blog (beginner, intermediate, expert, Snover)
  • Area(s) of expertise (i.e. Active Directory, Exchange, VMware, etc.)

Hopefully if readers like the style of your comment they will head towards your blog.  I hope for this to be a good way to get some useful scripts and one liners onto the site from people of different use areas, help readers find other blogs for learning from and to get a good collection of resources.

I aim to keep this post alive and keep it near the top.  So all that left for me to do now is thank everyone for the help and for those learning, I hope this helps.

Thursday 4 February 2010

Remove-Item

This is just going to be a quick post, it’s a quick bit about what I did earlier at work.  As a bit of background, we have lots of users logging onto lots of computers and profiles don’t currently exist in the roaming variety.  At times the profiles that create on the desktops around the place mess up and have to be deleted.  Doing this manually claims it takes between hours and days to complete.  Before Powershell I made a .bat file that had a list of usernames prefixed by rmdir.  Earlier I had to do the task again and I thought, how will I do this in powershell?

As a start I just went to the Documents and Settings and typed “Remove-Item .\04* –force” (for student users, usernames are prefixed with year of entry), then I though, Can I do more than one at a time so I tried “Remove-Item .\05*,.\06* –force”.

After being happy with that I thought, ‘what more can I do?’, so after “get-help remove-item” I noticed an exclude option, that got me thinking.  All I want to keep in is “All Users”,“Default User”, and any users starting with admin.  I ended up with the script as follows:

c:

cd '\documents and settings'

Remove-Item .\* –Exclude “All Users”,”Default User”,Admin* -force

That’s all there was to deleting everything but what I wanted in that directory – also completes quickly – no waiting for a few hours for the deletes to go though.

This is such a basic task made better with powershell.  Whatever you are trying to do, think, What Can Powershell Do?

Quick warning: DO NOT type “Remove-Item \*” without the . \ for current directory or you may wipe the c: drive